 MAPS
Make a Rainstorm with Sound
Summary
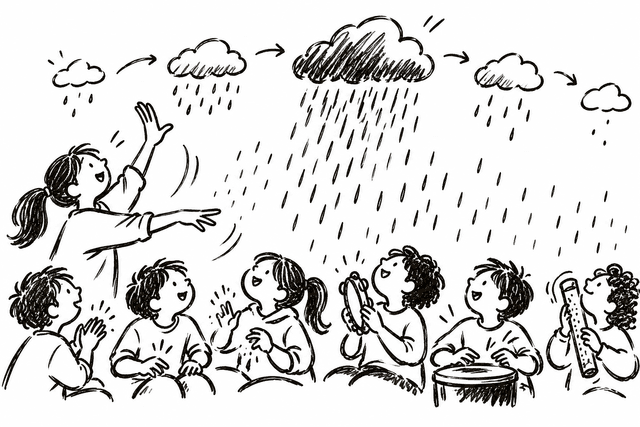
Students use body percussion, vocal sounds, and classroom instruments to create the sound of a rainstorm. Following the teacher’s cues, they gradually build the sound from light rain to a heavy storm and then fade back to silence. Through the activity, students experience changes in dynamics, timbre, and musical texture while practicing attentive listening and ensemble coordination.
Procedures
- 1
Ask students to remember the sounds they might hear before, during, and after a rainstorm. Invite them to imitate rain using body sounds or their voices, such as rubbing hands, tapping fingers, patting knees, clapping, stompping feet, or making soft vocal sounds.
- 2
Choose several of the sounds and arrange them from the lightest rain sound to the strongest storm sound. Help students establish a basic sound sequence such as:
silence → light rain → growing rain → heavy storm → fading rain → silence.
- 3
The teacher acts as conductor and brings in one sound layer at a time. Students begin only when they receive a cue and maintain a relatively steady sound until another cue is given.
- 4
Gradually increase the number of participants, the variety of sounds, and the overall dynamic level so that the sound grows from light and sparse to loud and dense.
- 5
After reaching the strongest point of the storm, reverse the process. Gradually remove sound layers and lower the intensity until only the lightest rain remains, then return to complete silence.
- 6
After the first performance, ask students to describe how the sound changed. Possible prompts include:
Which part was the softest? Which part was the loudest? Which sounds made the rain feel denser? Which sounds best represented light rain, heavy rain, or the end of the storm?
- 7
Perform the rainstorm again, this time asking students to respond more precisely to conducting gestures for entrances, cutoffs, crescendos, and decrescendos.
Variations
1. Instrument Version: Add shakers, rainsticks, drums, triangles, cymbals, or other classroom percussion. Ask students to decide which type of rain each timbre can represent, then layer the instruments into the existing rainstorm.
2. Student Conductor Version: Invite a student to conduct the group, deciding when sounds enter, grow, fade, and stop while the ensemble follows the student’s gestures.
Soundscape Extension: Add wind, thunder, leaves, or other weather-related sounds to expand the activity into a short storm soundscape.
3. Graphic Representation Extension: After performing, ask students to draw the sound of the storm using lines, shapes, or changes in size to represent changes from soft to loud, sparse to dense, and back to silence.
4. Musical Concept Extension: After students have physically experienced the sound changes, introduce or review terms such as dynamics, crescendo, decrescendo, timbre, and texture, connecting the formal vocabulary to what students just performed.
Activity Preparation
1. Open classroom space where students can sit or stand comfortably
2. Optional classroom percussion instruments
3. No previous notation knowledge is required
4. Students should be able to watch and respond to simple teacher cues
Activity Sources
- Source Type:
- Website / Online resource
- Source:
- Adapted from The Kennedy Center / ARTSEDGE lesson Making Rain: What Is the Cultural Origin and Purpose of a Rainstick?, Grades K–2. https://www.kennedy-center.org/education/resources-for-educators/classroom-resources/lessons-and-activities/lessons/k-2/making-rain/
- Adaptation Notes:
- The original Kennedy Center lesson is a larger interdisciplinary unit combining sensory exploration, science, literature, cultural study, rainstick making, and poetry. This version extracts and expands the sound-based “making rain” idea into a stand-alone music activity focused on dynamics, timbre, texture, listening, and ensemble response. The conducting structure and gradual sound-building sequence have been added to make the activity more directly usable in a music classroom.
MAPS teaching activities may come from a variety of sources, including original contributions by the MAPS team, online resources, published materials, activities learned from teachers, activities shared by colleagues, traditional teaching practices, and other sources. When a source can be reasonably identified, we make every effort to acknowledge it on the relevant activity page or in the accompanying reference information.
Some content may be organized, translated, structured, or adapted by the MAPS team for specific teaching contexts. Such editorial or instructional adaptation does not mean that MAPS claims ownership of the underlying third-party material. Rights to third-party content remain with the original authors, publishers, or other lawful rights holders.
If you are an author, copyright holder, or authorized representative and have questions or concerns regarding the source, attribution, or use of any content, please contact us:
Email: musicactivityps@gmail.com
Make a Rainstorm with Sound
Summary
Students use body percussion, vocal sounds, and classroom instruments to create the sound of a rainstorm. Following the teacher’s cues, they gradually build the sound from light rain to a heavy storm and then fade back to silence. Through the activity, students experience changes in dynamics, timbre, and musical texture while practicing attentive listening and ensemble coordination.
Procedures
- 1
Ask students to remember the sounds they might hear before, during, and after a rainstorm. Invite them to imitate rain using body sounds or their voices, such as rubbing hands, tapping fingers, patting knees, clapping, stompping feet, or making soft vocal sounds.
- 2
Choose several of the sounds and arrange them from the lightest rain sound to the strongest storm sound. Help students establish a basic sound sequence such as:
silence → light rain → growing rain → heavy storm → fading rain → silence.
- 3
The teacher acts as conductor and brings in one sound layer at a time. Students begin only when they receive a cue and maintain a relatively steady sound until another cue is given.
- 4
Gradually increase the number of participants, the variety of sounds, and the overall dynamic level so that the sound grows from light and sparse to loud and dense.
- 5
After reaching the strongest point of the storm, reverse the process. Gradually remove sound layers and lower the intensity until only the lightest rain remains, then return to complete silence.
- 6
After the first performance, ask students to describe how the sound changed. Possible prompts include:
Which part was the softest? Which part was the loudest? Which sounds made the rain feel denser? Which sounds best represented light rain, heavy rain, or the end of the storm?
- 7
Perform the rainstorm again, this time asking students to respond more precisely to conducting gestures for entrances, cutoffs, crescendos, and decrescendos.
Variations
1. Instrument Version: Add shakers, rainsticks, drums, triangles, cymbals, or other classroom percussion. Ask students to decide which type of rain each timbre can represent, then layer the instruments into the existing rainstorm.
2. Student Conductor Version: Invite a student to conduct the group, deciding when sounds enter, grow, fade, and stop while the ensemble follows the student’s gestures.
Soundscape Extension: Add wind, thunder, leaves, or other weather-related sounds to expand the activity into a short storm soundscape.
3. Graphic Representation Extension: After performing, ask students to draw the sound of the storm using lines, shapes, or changes in size to represent changes from soft to loud, sparse to dense, and back to silence.
4. Musical Concept Extension: After students have physically experienced the sound changes, introduce or review terms such as dynamics, crescendo, decrescendo, timbre, and texture, connecting the formal vocabulary to what students just performed.
Activity Preparation
1. Open classroom space where students can sit or stand comfortably
2. Optional classroom percussion instruments
3. No previous notation knowledge is required
4. Students should be able to watch and respond to simple teacher cues
Activity Sources
- Source Type:
- Website / Online resource
- Source:
- Adapted from The Kennedy Center / ARTSEDGE lesson Making Rain: What Is the Cultural Origin and Purpose of a Rainstick?, Grades K–2. https://www.kennedy-center.org/education/resources-for-educators/classroom-resources/lessons-and-activities/lessons/k-2/making-rain/
- Adaptation Notes:
- The original Kennedy Center lesson is a larger interdisciplinary unit combining sensory exploration, science, literature, cultural study, rainstick making, and poetry. This version extracts and expands the sound-based “making rain” idea into a stand-alone music activity focused on dynamics, timbre, texture, listening, and ensemble response. The conducting structure and gradual sound-building sequence have been added to make the activity more directly usable in a music classroom.
MAPS teaching activities may come from a variety of sources, including original contributions by the MAPS team, online resources, published materials, activities learned from teachers, activities shared by colleagues, traditional teaching practices, and other sources. When a source can be reasonably identified, we make every effort to acknowledge it on the relevant activity page or in the accompanying reference information.
Some content may be organized, translated, structured, or adapted by the MAPS team for specific teaching contexts. Such editorial or instructional adaptation does not mean that MAPS claims ownership of the underlying third-party material. Rights to third-party content remain with the original authors, publishers, or other lawful rights holders.
If you are an author, copyright holder, or authorized representative and have questions or concerns regarding the source, attribution, or use of any content, please contact us:
Email: musicactivityps@gmail.com